|
FreeRTOS+UDP was removed from the FreeRTOS kernel download from
FreeRTOS V10.1.0. See the FreeRTOS+TCP stack, which can be
configured for UDP only use, as an alternative.
|

|
Example FreeRTOS-Plus-UDP Project
For NXP LPC1830 Cortex-M3 Microcontroller
|
On this page:
|

The LPC1830 Xplorer Board from NGX Technologies
|
This demo application is available in the following directory
of the offical
FreeRTOS zip file download:
FreeRTOS-Plus/Demo/FreeRTOS_Plus_UDP_and_CLI_LPC1830_GCC
The project is pre-configured to target the very low cost LPC1830 Xplorer
board from
NGX Technologies.
In the USA the target hardware can be purchased from
(amongst other places) Newark and
Digikey.
In Europe the hardware can be purchased from (amongst other places)
Farnell.
In Asia the hardware can be purchased directly from
NGX Technologies.
Other distributors are listed on the NGX website.
The project is pre-configured to build with the
free LPCXpresso IDE,
which comes packages with the GCC ARM compiler.
The demo includes the following standard demo files:
-
The two echo client tasks
-
A command console with IP stack specific commands
The project can optionally be built to include FreeRTOS-Plus-Trace
recording capabilities, along with
FreeRTOS-Plus-CLI commands that start and stop
a trace recording.
A third party USB CDC driver allows the command console to be accessed
via a standard dumb terminal, such as HyperTerminal or Tera Term. The
target hardware must be powered through the USB0 connector (on the opposite
side to the Ethernet jack) for the virtual COM port to be available.
Note: The third part USB driver is adequate for command console
input and output, but is not robust under heavy load.
-
Execute the CreateProjectDirectoryStructure.bat batch file to create
the demo project directory structure. The batch file is
located in the following directory of the main FreeRTOS download:
FreeRTOS-Plus/Demo/FreeRTOS_Plus_UDP_and_CLI_LPC1830_GCC/
-
Start the LPCXpresso IDE.
Create a new workspace, or select an existing workspace when prompted.
-
Select "Import" from the IDE "File" menu, then select "Existing Projects Into Workspace", as
shown below, before clicking "Next".
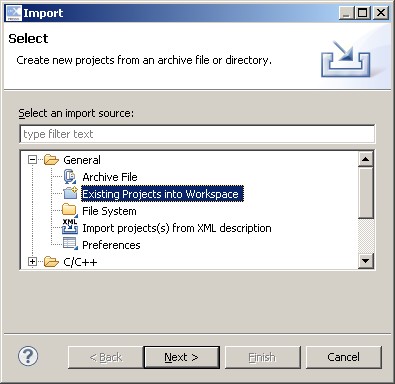 Selecting "Existing Projects Into Workspace" in the Import dialogue box
-
Click the "Select Root Directory" radio button, then
navigate to and select the FreeRTOS-Plus/Demo/FreeRTOS_Plus_UDP_and_CLI_LPC1830_GCC
directory on the FreeRTOS download.
The dialogue box will show a single project, ensure
the project is selected, then click finish. The imported project
will appear in the LPCXpresso IDE's project explorer window.
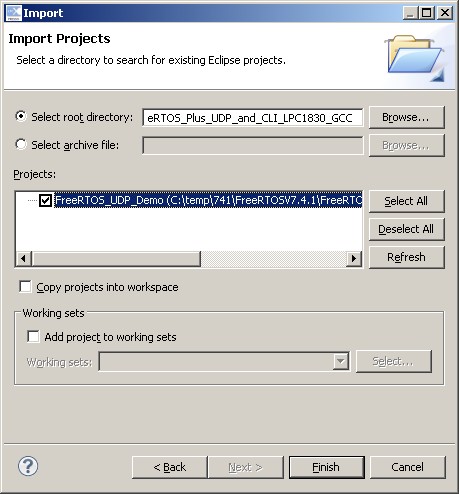 The import dialogue with a single project shown
-
Follow the instructions provided on the
Echo Client example documentation page
to set up an echo server and set the address of the echo server
in FreeRTOSConfig.h.
-
Set the constants configMAC_ADDR0 to configMAC_ADDR5 to ensure
the MAC address used is unique on the network. The constants
are located at the bottom of FreeRTOSConfig.h.
-
If IP address assignment is managed by a
DHCP server
then no further configuration is required.
If IP address assignment is not managed by a DHCP server then set
ipconfigUSE_DHCP to 0 in FreeRTOSIPConfig.h,
then edit the constants at the bottom of FreeRTOSConfig.h that
set the default values for a static IP address, DNS server address,
gateway address and netmask to ensure they are valid for the
Ethernet network. The IP address will be valid if the first three
octets of the IP address match the first three octets of other
IP addresses on the same network - each IP address must be unique
on the network.
-
To build, select "FreeRTOS_UDP_Demo" in the project
explorer, then select "Build Project" from the IDE's
"Project" menu.
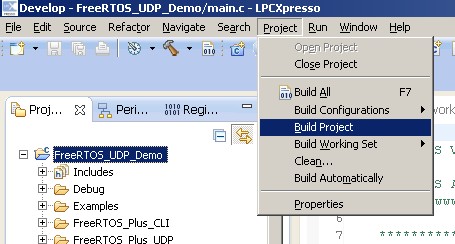 Selecting "Build Project" with FreeRTOS_UDP_Demo selecting in the project explorer
The target hardware must be connected to the debugging host computer
(the computer running the LPCXpresso IDE) using separate debugging hardware.
It is recommended that a
Red Probe
with a
10-pin adaptor is used for this purpose, but an LPCLink provides a lower cost (but much
lower performance) alternative. If you have an
LPCXpresso hardware
board then you can make a standalone LPCLink by cutting the
tracks that link the debugging interface side of the LPCXpresso hardware
from the target side.
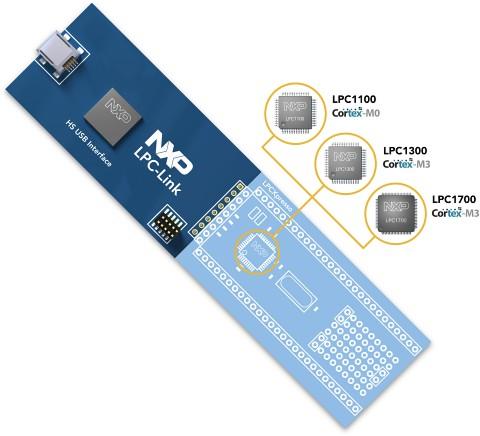 The LPCLink side of the LPCXpresso board
With the LPC1830 Xplorer board connected to the debugger, click the
Debug option in the LPCXpresso Quick Start panel.
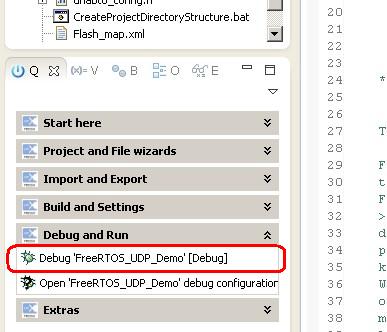 The Debug option in the quick start panel
-
The UDP/IP Related CLI Commands
page contains a video that demonstrates:
-
Connecting to the FreeRTOS command line interface.
-
Viewing the IP address assigned to the target hardware
by the DHCP server.
-
Using the DNS resolver to ping a host name.
-
Viewing the network traffic between the echo client
(the FreeRTOS-Plus-UDP application) and the echo server.
-
NOTE 1:
FreeRTOS-Plus-CLI is accessed through a virtual COM port (USB CDC).
The COM port enumerates when the application starts to execute,
but will disappear each time a debugging session is re-started.
For that reason ensure the terminal used as the FreeRTOS-Plus-CLI interface
is disconnected from the COM port before a debugging session is
halted. If the terminal is still connected to the COM port when
the application stops running, or when a debugging session is
restarted, then it is likely that the COM port will no longer
be accessible until the terminal program has itself been shut
down and restarted.
-
NOTE 2:
Increasing the value of echoLOOP_DELAY in TwoEchoClients.c will
decrease the amount of network traffic that is generated.
-
LED D3 will toggle every 500ms to show the application is running.
-
You may be prompted to install the virtual COM port driver the
first time the target hardware is plugged into the host computer.
The necessary .inf necessary to complete the installation is
included in the ThirdParty/USB_CDC/inf directory of the
demo's zip file.
The example demonstrates some FreeRTOS-Plus-Trace features:
-
Some of the queues and semaphores are named for viewing in
FreeRTOS-Plus-Trace, and
-
The zero copy echo client inserts a user event into the trace immediately
before sending out an echo request, and another immediately
before waiting for the echo reply.
To include the trace recorder in the build:
-
Set configINCLUDE_TRACE_RELATED_CLI_COMMANDS to 1 in
FreeRTOSConfig.h before building then running application.
-
Start a trace recording by entering "trace start" in the command
console. End the trace recording by entering "trace stop"
in the command console.
-
Obtain the size of the trace recorder buffer by
inspecting "sizeof( RecorderDataType )" in the expressions
window (see the center image below).
-
Pause the debugger and open the Memory Browser window by
selecting the "Show View->Other->Debug->Memory Browser" option
from the IDE's Window menu.
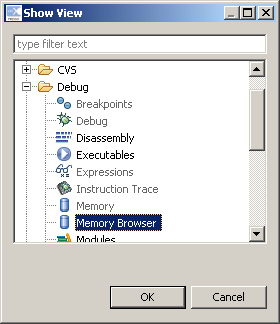
Opening the Memory Browser window
-
Find the start of the recorded data by viewing the memory
at "&RecorderData" in the Memory Browser window.
-
Use the Export Memory speed button (LPCXpresso version V5.0.14
or higher is required) in the Memory Browser window to export
as a raw binary the entire RecorderData variable. Then length
of the memory exported must be at least sizeof( RecorderDataType ),
but can be greater than sizeof( RecorderData ).

Exporting the RTOS trace recording. Click to
see a larger image.
-
The exported file can be opened in the FreeRTOS-Plus-Trace tool
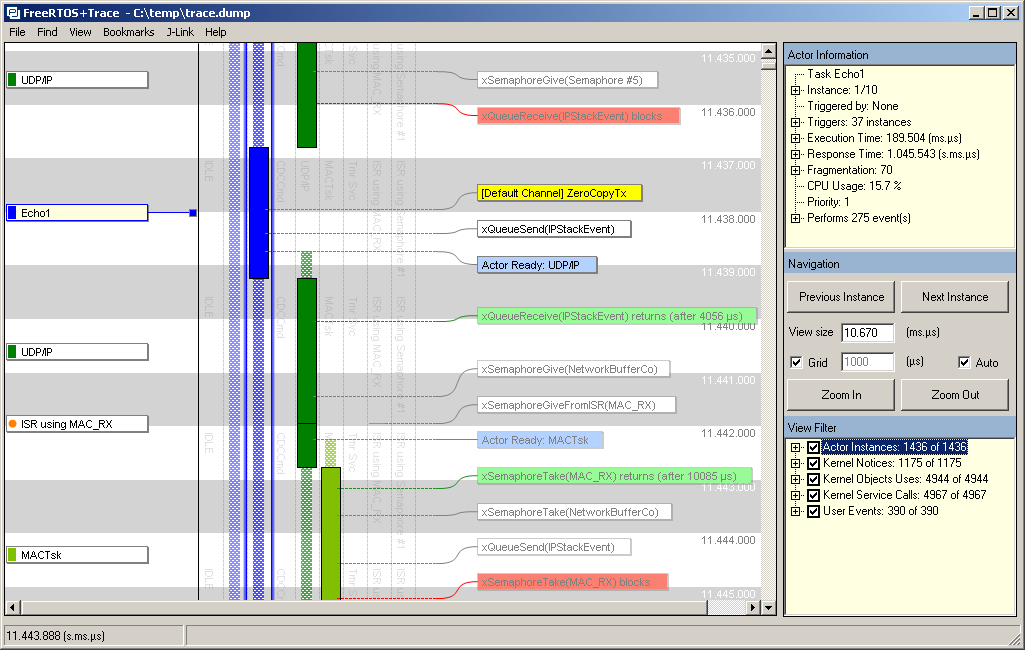
Viewing the RTOS trace file in FreeRTOS-Plus-Trace
Copyright (C) Amazon Web Services, Inc. or its affiliates. All rights reserved.