This demo uses FreeRTOS to create a simple web server and HID class mouse driver implementation on the AT91SAM7X-EK prototyping board (instructions are provided should you wish to use an alternative development board). The demo is configured to use Eclipse Europa, the Yagarto GCC tools, OpenOCD and the uIP mini TCP/IP stack. The small joystick built onto the AT91SAM7X-EK is used to provide the mouse input. FreeRTOS has made some modifications to the uIP stack since this demo was created. See the Embedded Ethernet Examples List page for more information. The FreeRTOS zip file contains everything required other than the Eclipse and Yagarto tools. Please follow these instructions carefully to install and configure Eclipse correctly for use with this demo application. The included OpenOCD executable and associated configuration files are set for use with a Macraigor Wiggler compatible JTAG interface. Note that uIP and OpenOCD are licensed separately from FreeRTOS.org. Users must familiarise themselves with the respective licenses. Note to Linux users: Although all the tools used are cross platform - I have only tested the SAM7X/Eclipse build on a windows host.

IMPORTANT! Notes on using the Eclipse AT91SAM7X Web Server DemoPlease read all the following points before using this RTOS port.See also the FAQ My application does not run, what could be wrong? Source Code OrganisationThe Eclipse workspace for the Eclipse SAM7X demo is located in the FreeRTOS/Demo/ARM7_AT91SAM7X256_Eclipse directory. This is the directory to select when prompted for a workspace location during the Eclipse startup process. Be sure to read the Eclipse installation and configuration instructions prior to building the project.The FreeRTOS zip file download contains the files for all the ports and demo application projects. It therefore contains many more files than used by this demo. See the Source Code Organization section for a description of the downloaded files and information on creating a new project.
The Demo ApplicationDemo application setupConnect the AT91SAM7X-EK prototyping board to a computer running a web browser either directly using a point to point (crossover) Ethernet cable, or via a hub/router using a standard Ethernet cable. The prototyping board should also allow the use of a standard Ethernet cable when connecting point to point, but I have not tested this configuration.The IP address used by the demo is set by the constants UIP_IPADDR0 to UIP_IPADDR3 within the file Demo/ARM7_AT91SAM7X256_Eclipse/RTOSDemo/FreeRTOSConfig.h. The IP addresses used by the web browser computer and the prototyping board must be compatible. This can be ensured by making the first three octets of both IP addresses identical. For example, if the web browser computer uses IP address 192.168.100.1, then the prototyping board can be given any address in the range 192.168.100.2 to 192.168.100.254 (barring any addresses already present on the network). The MAC address used by the demo is set by the constants UIP_ETHADDR0 to UIP_ETHADDR5, also within FreeRTOSConfig.h. You must ensure that the configured MAC address is unique on the network to which the prototyping board is being connected. The demo application uses the LEDs built into the prototyping board so no other hardware setup is required.
Building the demo applicationAgain - please refer to the Eclipse installation and configuration instructions for more detailed information.
Running the demo applicationOnce again - please refer to the Eclipse installation and configuration instructions for more detailed information.
FunctionalityThe demo application creates 27 tasks. These tasks consist predominantly of the standard demo application tasks (see the demo application section for details of the individual tasks).The following tasks/functions are created in addition to the standard demo tasks:
When executing correctly the demo application will behave as follows:
Served Web PagesThe top of each served page includes a menu containing a link to every other page.
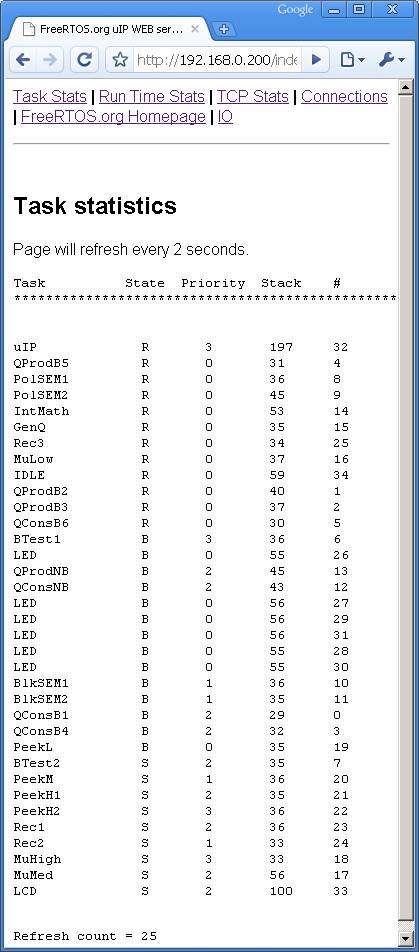 The served RTOS stats page The RTOS stats page provides run time information on the state of each task within the system - including the stack high water mark (the minimum amount of stack there has been available at any time since the task started executing). The page will reload approximately every two seconds - depending on network load. This page is transmitted in three sections - the HTML header and menu, the dynamically generated content, then finally the HTML footer. This makes the page relatively fast to load. It could be optimised further by transmitting the entire page in one go. The continuous reloading can sometimes make navigating away from the RTOS stats page a little tricky.
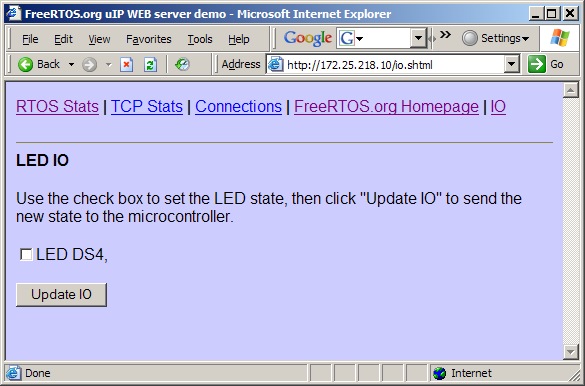 The served IO page The IO page provides a simple interface that demonstrates data being sent to the SAM7 microcontroller. The check box permits the state of the LED DS4 to be set and queried. Changes are sent to the target hardware by clicking the "Update IO" button. Note that the LED DS4 is also under control of the 'check' tick hook so will toggle every 5 seconds - overwriting any commands sent from the web server. The TCP Stats and Connections pages display run time networking information. Note that these pages transmit each line individually so will not load quickly. This demonstrates how memory usage can be optimised through the use of a small transmit buffer by sacrificing the achieved data throughput.
RTOS Configuration and Usage DetailsThis demo uses the FreeRTOS SAM7S GCC port - important usage information can be found on the SAM7X/Rowley CrossWorks demo documentation page. Please read the usage information provided on the linked page!Copyright (C) Amazon Web Services, Inc. or its affiliates. All rights reserved.
|
|||||||||||||||||||