coreMQTT Demo (without TLS)
coreMQTT is an MIT licensed open source MQTT C library for microcontroller and small microprocessor based IoT devices.
Notice: We recommend using mutual authentication in any Internet of Things (IoT)
application. The demo on this page is only meant for educational purposes as it demonstrates MQTT communication prior to
introducing encryption and authentication. It is not intended to be suitable for production use.
Single Threaded Vs Multi Threaded
There are two coreMQTT usage models, single threaded and multithreaded (multitasking). Using the
MQTT library solely from one thread within an otherwise multi-threaded application, as the demo documented on this page
does, is equivalent to the single threaded use case. Single threaded use cases require the application writer to make
repeated explicit calls into the MQTT library. Multithreaded use cases can instead execute the MQTT protocol in the
background within an agent (or daemon) task. Executing the MQTT protocol in
an agent task removes the need for the application writer to explicitly manage any MQTT state or call the
MQTT_ProcessLoop() API function. Using an agent task also enables multiple application tasks to share a
single MQTT connection without the need for synchronization primitives such as mutexes.
Demo Introduction
This example project is one of three that introduce the concepts described on the "TLS
Introduction" page one at a time. The first example (this page) demonstrates unencrypted MQTT communication. The
second example builds on the first to introduce server authentication
(where the IoT client authenticates the MQTT server it connects to). The third
example builds on the second to introduce strong mutual authentication (where the MQTT server also authenticates the IoT
client connecting to it).
This first project in the series only demonstrated the basic MQTT use cases of how to connect to a MQTT broker and the
subscribe-publish workflow of MQTT at the QoS 0 level. After it subscribes to a single
topic filter, it publishes to that topic, then waits to receive that same message back from the server. This cycle of publishing
to the broker and receiving the same message back from the broker is repeated indefinitely. As it uses QoS 0 it does not implement
any retransmission mechanism for publish messages.
This demo does not create a secure connection and is therefore not suitable for production use - do not send
any confidential information on an unencrypted network connection. The demo does demonstrate how to connect with an exponential
backoff time (including timing jitter) in the event of a connection failure. Exponentially increasing the time between connection
attempts, and including some random timing jitter, is best practice for large IoT device fleets as it prevents all the IoT devices
attempting to reconnect at the same time, should they all become disconnected at the same time.
This basic MQTT demo project uses the FreeRTOS
Windows port, enabling it to be built and evaluated with the free Community version of Visual Studio on Windows, so without the need for any particular MCU hardware.
Source Code Organization
The demo project is called mqtt_plain_text_demo.sln and can be found in the FreeRTOS-Plus/Demo/coreMQTT_Windows_Simulator/MQTT_Plain_Text
directory of the main FreeRTOS download (and in Github, linked from the download page).
Configuring the Demo Project
The demo uses the FreeRTOS-Plus-TCP TCP/IP stack, so follow the
instructions provided for the TCP/IP starter project
to ensure you:
- Have the pre-requisite components
installed (such as WinPCap).
- Optionally set a static or dynamic
IP address, gateway address and netmask.
- Optionally set a MAC address.
- Select an Ethernet network
interface on your host machine.
- …and importantly test
your network connection before attempting to run the MQTT demo.
Each demo project has its own configuration settings. When you are following the network
configuration instructions, make sure to apply the settings in the MQTT demo project, rather than
the TCP/IP starter project. By default the TCP/IP stack is configured to use a dynamic IP address.
Configuring the MQTT Broker Connection
Option 1: Using the publicly hosted Mosquitto MQTT broker (web hosted)
The demo project can communicate with Mosquitto's publicly hosted message broker at “test.mosqitto.org”. This should
work if the demo connects to a network that has a DHCP service and Internet access. Note that the FreeRTOS Windows port
only works with a wired Ethernet network adapter, which can be a virtual Ethernet adapter. You should use a separate MQTT
client, such as MQTT.fx, to test the
MQTT connection from your host machine to the public MQTT broker. To use the hosted Mosquitto server:
- Open your local copy of
/FreeRTOS-Plus/Demo/coreMQTT_Windows_Simulator/MQTT_Plain_Text/demo_config.h
- Add the following lines:
- #define democonfigMQTT_BROKER_ENDPOINT "test.mosquitto.org"
- #define democonfigMQTT_BROKER_PORT ( 1883 )
Note: Mosquitto is an open source MQTT message broker that supports MQTT versions 5.0, 3.1.1, and 3.1. It
is part of the Eclipse foundation and is an Eclipse
IoT project. The test.mosquitto.org MQTT broker is not affiliated with or maintained by FreeRTOS and may be unavailable at
any time.
Option 2: Using a locally hosted Mosquitto MQTT message broker (host machine)
The Mosquitto broker can also run locally, either on your host machine (the machine used to build the demo application),
or another machine on your local network. To do this:
- Follow the instructions on
https://mosquitto.org/download/ to download and install Mosquitto locally.
- Open “mosquitto.conf”, which is located in the Mosquitto install directory, and set the “bind_address” to the network
on which Mosquitto will listen for connection on your system.
- Find the IP address of your host machine (run the
ipconfig command on Windows, or ifconfig
on Linux or MAC OS). Note that the FreeRTOS Windows port only works with a wired Ethernet network adapter, which can
be a virtual Ethernet adapter.
- Open
FreeRTOS-Plus/Demo/coreMQTT_Windows_Simulator/MQTT_Plain_Text/demo_config.h.
- Add the following lines to set democonfigMQTT_BROKER_ENDPOINT to the IP address of the machine on which Mosquitto is
running, which must be a machine on the same subnet as the network to which the demo is connected:
#define democonfigMQTT_BROKER_ENDPOINT "w.x.y.z"#define democonfigMQTT_BROKER_PORT ( 1883 )
You should use a separate MQTT client, such as MQTT.fx,
to test the MQTT connection from your host machine to the installed MQTT broker.
Note: Port number 1883 is the default port number for unencrypted MQTT. If you cannot use that port (for
example if it is blocked by your IT securty policy) then change the port used by Mosquitto to a high port number (for example
something in the 50000 to 55000 range), and set mqttexampleMQTT_BROKER_PORT accordingly.
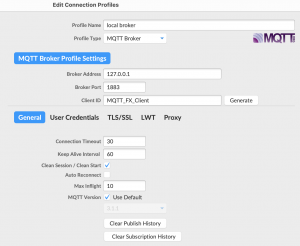
To use MQTT.fx to test the MQTT connection, download it first using the above link, then edit the connection profiles. After
clicking “Connect”, make sure the bulb symbol turns green.
Option 3: Any other unencrypted MQTT broker of your choosing:
Any MQTT broker that supports unencrypted TCP/IP communication can also be used with this demo. To do this:
- Open your local copy of
/FreeRTOS-Plus/Demo/coreMQTT_Windows_Simulator/MQTT_Plain_Text/demo_config.h
- Add the following lines with settings specific to your chosen broker:
- #define democonfigMQTT_BROKER_ENDPOINT "your-desired-endpoint"
- #define democonfigMQTT_BROKER_PORT ( 1883 )
Building the Demo Project
The demo project uses the
free community edition of Visual Studio. To build the demo:
- Open the
/FreeRTOS-Plus/Demo/coreMQTT_Windows_Simulator/MQTT_Plain_Text/mqt_plain_text_demo.sln Visual Studio solution file from within the Visual Studio IDE
- Select ‘build solution’ from the IDE’s ‘build’ menu
Troubleshooting for option 2: using a local Mosquitto broker
Failed to connect to server: FreeRTOS_Connect failed.
- Add “listener 1883 0.0.0.0” in mosquitto.conf and restart mosquitto
Connection refused: not authorized.
- Add “allow_anonymous true” in mosquitto.conf and restart mosquitto
Functionality
The demo creates a single application task that loops through a set of examples that demonstrate how to connect
to the broker, subscribe to a topic on the broker, publish to a topic on the broker, and disconnect from the broker
again. The demo application both subscribes to and publishes to the same topic. As a result, each time the
demo publishes a message to the MQTT broker, the broker sends the same message back to the demo application. The structure
of the demo is shown below:
static void prvMQTTDemoTask( void * pvParameters )
{
uint32_t ulPublishCount = 0U, ulTopicCount = 0U;
const uint32_t ulMaxPublishCount = 5UL;
NetworkContext_t xNetworkContext = { 0 };
MQTTContext_t xMQTTContext;
MQTTStatus_t xMQTTStatus;
PlaintextTransportStatus_t xNetworkStatus;
for( ; ; )
{
xNetworkStatus = prvConnectToServerWithBackoffRetries( &xNetworkContext );
configASSERT( xNetworkStatus == PLAINTEXT_TRANSPORT_SUCCESS );
prvCreateMQTTConnectionWithBroker( &xMQTTContext, &xNetworkContext );
prvMQTTSubscribeWithBackoffRetries( &xMQTTContext );
for( ulPublishCount = 0; ulPublishCount < ulMaxPublishCount; ulPublishCount++ )
{
prvMQTTPublishToTopic( &xMQTTContext );
xMQTTStatus = MQTT_ProcessLoop(
&xMQTTContext,
mqttexamplePROCESS_LOOP_TIMEOUT_MS );
configASSERT( xMQTTStatus == MQTTSuccess );
vTaskDelay( mqttexampleDELAY_BETWEEN_PUBLISHES );
}
prvMQTTUnsubscribeFromTopic( &xMQTTContext );
xMQTTStatus = MQTT_ProcessLoop( &xMQTTContext,
mqttexamplePROCESS_LOOP_TIMEOUT_MS );
configASSERT( xMQTTStatus == MQTTSuccess );
xMQTTStatus = MQTT_Disconnect( &xMQTTContext );
xNetworkStatus = Plaintext_FreeRTOS_Disconnect( &xNetworkContext );
configASSERT( xNetworkStatus == PLAINTEXT_TRANSPORT_SUCCESS );
vTaskDelay( mqttexampleDELAY_BETWEEN_DEMO_ITERATIONS );
}
}
Connecting to the MQTT Broker
In the function above, prvConnectToServerWithBackoffRetries() attempts to make a TCP connection to
the MQTT broker. If the connection fails, it retries after a timeout. The timeout value will exponentially increase
and include some randomised jitter until the maximum number of attempts are reached or the maximum timeout value is
reached. This type of backoff is used in production devices to ensure a fleet of IoT devices that all get disconnected
at the same time do not all try and re-connect at the same time - and in so doing - overwhelm the server. If the connection
is successful, then the connected TCP socket is returned in the xNetworkContext</tt parameter.
The function prvCreateMQTTConnectionWithBroker() demonstrates how to establish an unencrypted connection
to a MQTT broker with clean session. It uses the FreeRTOS-Plus-TCP
transport interface which is implemented in the file
FreeRTOS-Plus/Source/Application-Protocols/platform/freertos/transport/src/plaintext_freertos.c. The definition
of prvCreateMQTTConnectionWithBroker() is shown below. The keep-alive seconds for the broker is set in
xConnectInfo.
The function below shows how FreeRTOS-Plus-TCP transport interface and time function are set in MQTT Context using MQTT_Init().
It also shows how event callback function pointer ( prvEventCallback ) is set. This callback is used for reporting
incoming messages.
static void prvCreateMQTTConnectionWithBroker( MQTTContext_t * pxMQTTContext,
NetworkContext_t * pxNetworkContext )
{
MQTTStatus_t xResult;
MQTTConnectInfo_t xConnectInfo;
bool xSessionPresent;
TransportInterface_t xTransport;
xTransport.pNetworkContext = pxNetworkContext;
xTransport.send = Plaintext_FreeRTOS_send;
xTransport.recv = Plaintext_FreeRTOS_recv;
xResult = MQTT_Init(
pxMQTTContext,
&xTransport,
prvGetTimeMs,
prvEventCallback,
&xBuffer );
configASSERT( xResult == MQTTSuccess );
( void ) memset( ( void * ) &xConnectInfo, 0x00, sizeof( xConnectInfo ) );
xConnectInfo.cleanSession = true;
xConnectInfo.pClientIdentifier = democonfigCLIENT_IDENTIFIER;
xConnectInfo.clientIdentifierLength = ( uint16_t ) strlen(
democonfigCLIENT_IDENTIFIER );
xConnectInfo.keepAliveSeconds = mqttexampleKEEP_ALIVE_TIMEOUT_SECONDS;
xResult = MQTT_Connect(
pxMQTTContext,
&xConnectInfo,
NULL,
mqttexampleCONNACK_RECV_TIMEOUT_MS,
&xSessionPresent );
configASSERT( xResult == MQTTSuccess );
}
Subscribing to a MQTT Topic
The function prvMQTTSubscribeWithBackoffRetries() demonstrates how to subscribe to a topic filter
on the MQTT broker. The example demonstrates how to subscribe to one topic filter, but it is possible to pass a list
of topic filters in the same subscribe API call to subscribe to more than one topic filter. Also, in case the MQTT
broker rejects the subscription request, then the subscription will be retried for MAX_RETRY_ATTEMPTS. The definition
of the function is shown below:
static const char *const pcExampleTopic = "/example/topic";
static void prvMQTTSubscribeWithBackoffRetries( MQTTContext_t * pxMQTTContext )
{
MQTTStatus_t xResult = MQTTSuccess;
RetryUtilsStatus_t xRetryUtilsStatus = RetryUtilsSuccess;
RetryUtilsParams_t xRetryParams;
MQTTSubscribeInfo_t xMQTTSubscription[ mqttexampleTOPIC_COUNT ];
bool xFailedSubscribeToTopic = false;
( void ) memset( ( void * ) &xMQTTSubscription, 0x00, sizeof( xMQTTSubscription ) );
usSubscribePacketIdentifier = MQTT_GetPacketId( pxMQTTContext );
xMQTTSubscription[ 0 ].qos = MQTTQoS0;
xMQTTSubscription[ 0 ].pTopicFilter = pcExampleTopic;
xMQTTSubscription[ 0 ].topicFilterLength = strlen( pcExampleTopic );
RetryUtils_ParamsReset( &xRetryParams );
xRetryParams.maxRetryAttempts = MAX_RETRY_ATTEMPTS;
do
{
xResult = MQTT_Subscribe(
pxMQTTContext,
xMQTTSubscription,
1,
usSubscribePacketIdentifier );
configASSERT( xResult == MQTTSuccess );
xResult = MQTT_ProcessLoop( pxMQTTContext, mqttexamplePROCESS_LOOP_TIMEOUT_MS );
configASSERT( xResult == MQTTSuccess );
xFailedSubscribeToTopic = false;
if( xTopicFilterContext.xSubAckStatus == MQTTSubAckFailure )
{
xFailedSubscribeToTopic = true;
xRetryUtilsStatus = RetryUtils_BackoffAndSleep( &xRetryParams );
break;
}
configASSERT( xRetryUtilsStatus != RetryUtilsRetriesExhausted );
} while( ( xFailedSubscribeToTopic == true ) &&
( xRetryUtilsStatus == RetryUtilsSuccess ) );
}
Publishing to a Topic
The function prvMQTTPublishToTopic() demonstrates how to publish to a topic filter on the MQTT broker.
The definition of the function is shown below:
static const char *const pcExampleTopic = "/example/topic";
static void prvMQTTPublishToTopic( MQTTContext_t * pxMQTTContext )
{
MQTTStatus_t xResult;
MQTTPublishInfo_t xMQTTPublishInfo;
( void ) memset( ( void * ) &xMQTTPublishInfo, 0x00, sizeof(
xMQTTPublishInfo ) );
xMQTTPublishInfo.qos = MQTTQoS0;
xMQTTPublishInfo.retain = false;
xMQTTPublishInfo.pTopicName = pcExampleTopic;
xMQTTPublishInfo.topicNameLength = ( uint16_t ) strlen( pcExampleTopic );
xMQTTPublishInfo.pPayload = mqttexampleMESSAGE;
xMQTTPublishInfo.payloadLength = strlen( mqttexampleMESSAGE );
xResult = MQTT_Publish(
pxMQTTContext,
&xMQTTPublishInfo, 0U );
configASSERT( xResult == MQTTSuccess );
}
Receiving incoming messages
The application registers an event callback function before connecting to the broker as described earlier. The function
prvMQTTDemoTask() calls MQTT_ProcessLoop() to receive incoming messages. When an incoming MQTT
message is received, it calls the the event callback function registered by the application. The function
prvEventCallback() is an example of such event callback function; it examines the incoming packet type and
calls the appropriate handler. In the example below, the function either calls prvMQTTProcessIncomingPublish()
for handling incoming publish messages or prvMQTTProcessResponse() to handle Acks. Note there is a separate demo
that shows how to use coreMQTT in a thread safe way – in which case the MQTT protocol runs in the background and is not
required to call MQTT_ProcessLoop().
static void prvEventCallback( MQTTContext_t * pxMQTTContext,
MQTTPacketInfo_t * pxPacketInfo,
MQTTDeserializedInfo_t * pxDeserializedInfo )
{
( void ) pxMQTTContext;
if( ( pxPacketInfo->type & 0xF0U ) == MQTT_PACKET_TYPE_PUBLISH )
{
prvMQTTProcessIncomingPublish( pxDeserializedInfo->pPublishInfo );
}
else
{
prvMQTTProcessResponse( pxPacketInfo, pxDeserializedInfo->packetIdentifier );
}
}
Processing Incoming MQTT Publish Packets
The function prvMQTTProcessIncomingPublish() demonstrates how to process an incoming PUBLISH packet from
the MQTT broker. prvMQTTProcessResonse() demonstrates how to process acknowledgement packets. The definition
of the functions are shown below:
static const char *const pcExampleTopic = "/example/topic";
static void prvMQTTProcessIncomingPublish( MQTTPublishInfo_t * pxPublishInfo )
{
if( ( pxPublishInfo->topicNameLength == strlen( pcExampleTopic ) ) &&
( 0 == strcmp( pcExampleTopic, pxPublishInfo->pTopicName ) ) )
{
LogInfo( ( "Incoming Publish Topic Name: %.*s matches subscribed topic.\r\n"
"Incoming Publish Message : %.*s",
pxPublishInfo->topicNameLength,
pxPublishInfo->pTopicName,
pxPublishInfo->payloadLength,
pxPublishInfo->pPayload ) );
}
else
{
LogInfo( ( "Incoming Publish Topic Name: %.*s does not match subscribed topic.",
pxPublishInfo->topicNameLength,
pxPublishInfo->pTopicName ) );
}
}
static void prvMQTTProcessResponse( MQTTPacketInfo_t * pxIncomingPacket,
uint16_t usPacketId )
{
MQTTStatus_t xResult = MQTTSuccess;
uint8_t * pucPayload = NULL;
size_t ulSize = 0;
switch( pxIncomingPacket->type )
{
case MQTT_PACKET_TYPE_SUBACK:
xResult = MQTT_GetSubAckStatusCodes(
pxIncomingPacket,
&pucPayload,
&ulSize );
configASSERT( xResult == MQTTSuccess );
xTopicFilterContext.xSubAckStatus = *pucPayload;
configASSERT( usSubscribePacketIdentifier == usPacketId );
break;
case MQTT_PACKET_TYPE_UNSUBACK:
LogInfo( ( "Unsubscribed from the topic %s.", mqttexampleTOPIC ) );
configASSERT( usUnsubscribePacketIdentifier == usPacketId );
break;
case MQTT_PACKET_TYPE_PINGRESP:
LogWarn( ( "PINGRESP should not be handled by the application "
"callback when using MQTT_ProcessLoop.\n" ) );
break;
default:
LogWarn( ( "prvMQTTProcessResponse() called with unknown packet type:(%02X).",
pxIncomingPacket->type ) );
}
}
Unsubscribing from a Topic
The last step in the workflow is to unsubscribe from the topic so that the broker will no longer send any publishes
from pcExampleTopic. The definition of the function is shown below:
static const char *const pcExampleTopic = "/example/topic";
static void prvMQTTUnsubscribeFromTopic( MQTTContext_t * pxMQTTContext )
{
MQTTStatus_t xResult;
MQTTSubscribeInfo_t xMQTTSubscription[ mqttexampleTOPIC_COUNT ];
( void ) memset( ( void * ) &xMQTTSubscription, 0x00, sizeof(
xMQTTSubscription ) );
xMQTTSubscription[ 0 ].qos = MQTTQoS0;
xMQTTSubscription[ 0 ].pTopicFilter = pcExampleTopic;
xMQTTSubscription[ 0 ].topicFilterLength = ( uint16_t ) strlen(
pcExampleTopic);
usUnsubscribePacketIdentifier = MQTT_GetPacketId( pxMQTTContext );
xResult = MQTT_Unsubscribe( pxMQTTContext,
xMQTTSubscription,
sizeof( xMQTTSubscription ) / sizeof(
MQTTSubscribeInfo_t ),
usUnsubscribePacketIdentifier );
configASSERT( xResult == MQTTSuccess );
}
Copyright (C) Amazon Web Services, Inc. or its affiliates. All rights reserved.