Step 5: Configuring Peripheral Drivers and Middleware

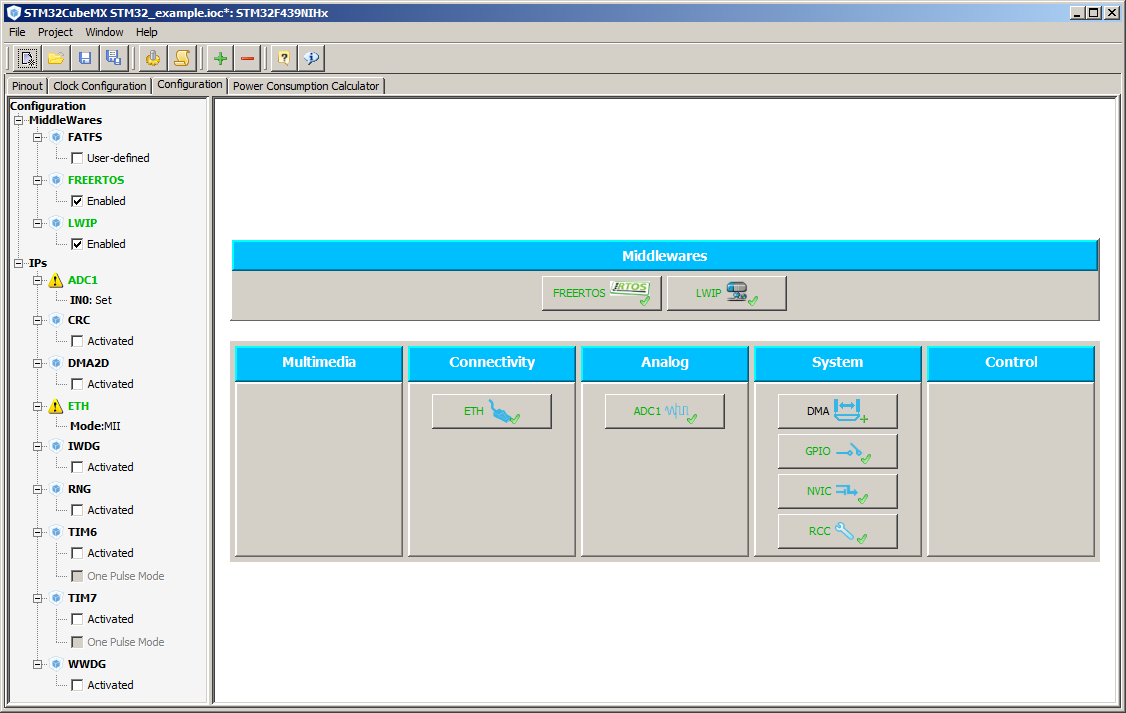
Main window, Configuration tab
Click to enlarge
The configuration tab is used to set the parameters for, and otherwise
configure, the components that have been selected using the Pinout tab.
The right pane of the Configuration tab displays a graphic depicting the
selected system, peripheral and middleware components categorised by
function type. The graphic includes a clickable button for each
component. Hover the mouse over a peripheral or middleware component's
button to see if source code can be generated for the peripheral, or if further
configuration is required for that component before that can happen.
The left pane of the Configuration tab displays the selected system,
peripheral and middleware components in a tree view. Exclamation marks
are used to highlight peripherals that are not yet properly configured.
Tool tips provide additional information when the mouse is hovered over
an exclamation mark.
If a selected
peripheral has no effect on the pin out then it can be enabled or disabled
from the tree view on the configuration tab. If a selected peripheral
does have an effect on the pin out then it can only be enabled or
disabled from the pin out tab.
The image on the right shows the configuration tab when only the Eth
and a single ADC have been selected. The first set of workflow steps
below demonstrate how to use the Configuration tab to configure a
hardware peripheral. The second set of workflow steps demonstrate how
to use the Configuration tab to configure a software component (FreeRTOS
in this case).
Workflow steps to configure a peripheral:
-
On the Configuration tab, click a button associated with a
hardware peripheral. A
mult-tab configuration dialogue will be displayed. Both
the tabs that are available and the contents of each tab
are specific to the selected peripheral.
-
If the selected peripheral has user configurable parameters
then the parameters will be displayed in, and can be edited
using, the "Parameter Setting" tab. Where applicable, the
editor will guide your selections by displaying drop down
lists of available options - and providing a description of
the parameter at the bottom of the dialogue.
Experiment with the "Parameter Settings" tab of the
configuration dialogue to modify the behaviour of a
hardware component.
-
If available for the selected peripheral, use the "NVIC Settings"
and "DMA Settings" tabs to configure the peripheral for the
desired mode of operation (polled mode, interrupt mode, etc.).
-
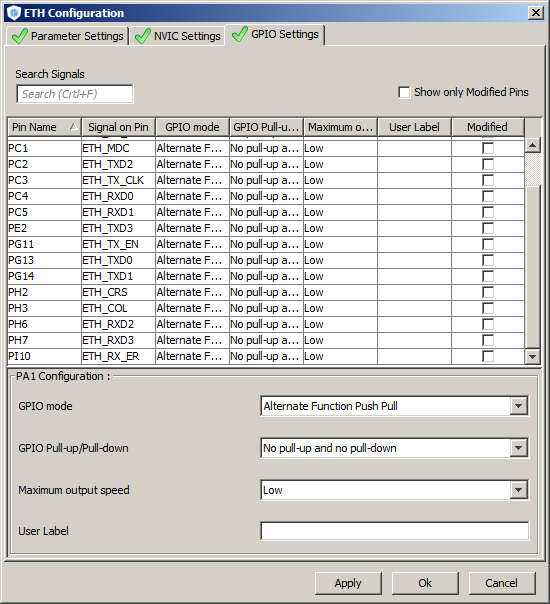
View the "GPIO Settings" tab. The pins used by the peripheral
can be configured and named from here. The pins used by
a dedicated peripheral (such as the Ethernet ETH) will already
be configured correctly for that peripheral.
|
Click images to enlarge
|

Modifying the ETH peripherals behaviour
|

The pre-completed pin configuration tab
|
Workflow steps to configure a software component:
-
On the Configuration tab, click a button associated with an
open source software or middleware component. A
mult-tab configuration dialogue will be displayed. Both
the tabs that are available and the contents of each tab
are specific to the selected open source software component.
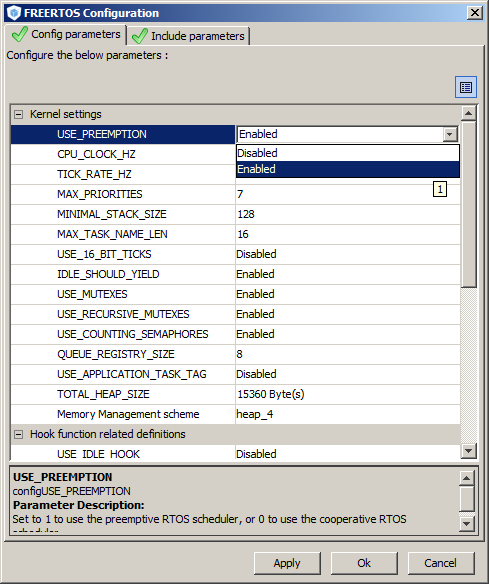
The image below shows the dialogue displayed when the
FreeRTOS button is pressed. One tab contains a table from
which the main FreeRTOSConfig.h parameters can be set. Another
tab contains a table that allows RTOS API functions to be
included or excluded from the build.
-
Experiment by changing some of the default settings. The
method used to change a setting depends on the parameter being
altered. For example, some parameters use a drop down
list, while others allow free text entry.
|

Using the dialogue to configure the RTOS
|
Items to note:
-
When a parameter is selected a description of that
parameter is displayed in the bottom of the dialogue
window.
-
There are some dependencies between FreeRTOS and
other middleware components. For example, using the lwiP
configuration dialogue to configure lwIP not to use the
services of an RTOS will automatically disable the FreeRTOS
component.
>>
On to step six
<<
Back to the STM32CubeMX practical walk-through index
Copyright (C) Amazon Web Services, Inc. or its affiliates. All rights reserved.