corePKCS11 对象演示
简介
本演示是 corePKCS11 演示系列中的第三个。它介绍了用于管理对象的 PKCS #11 API 部分
。对象定义为“存储在令牌上的项。可以是数据、证书或密钥。" 该演示
概述了如何使用 PKCS #11 来提取一些常用的对象。该界面
特别有用,因为它不仅可移植,使用起来也很灵活。使用 PKCS #11 操纵对象有利于保证安全性,
因为它能将对对象的攻击范围缩小到专门用于加密操作和保护对象的模块
。
注意: 此演示将向 Windows 文件系统写入 (EC) 公钥和私钥。这两个密钥
都包含在名为 "FreeRTOS_P11_Key.dat" 的二进制格式文件中。签名和验证演示直接依赖于此文件,
没有它将无法运行。
若需查看 PKCS #11 标准,
请点击此处。
corePKCS11 演示项目使用
FreeRTOSWindows 移植,因此可以使用 Windows 上的
Visual Studio 免费社区版
构建和评估,无需任何特定的殊 MCU 硬件。
此演示中展示的函数集可分为:
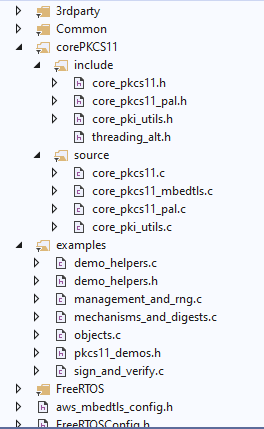
源代码组织
基于 PKCS #11 的双向验证演示的 Visual Studio 解决方案名为
pkcs11_demo.sln,位于
主 下载文件的 FreeRTOS\FreeRTOS-Plus\Demo\corePKCS11_Windows_Simulator\
FreeRTOS 目录中。
点击放大
配置演示项目
要配置演示项目,请将 configPKCS11_OBJECT_DEMO 设置为 1,
其位于 pkcs11_demo_config.h。此为默认启用项。完成上述操作后,即可运行演示,
无需其他演示配置步骤。
构建演示项目
此演示项目使用的是
Visual Studio 免费社区版。
- 打开
FreeRTOS\FreeRTOS-Plus\Demo\corePKCS11_Windows_Simulator\pkcs11_demo.sln
Visual Studio 解决方案文件,其位于 Visual Studio IDE 内。
- 在 IDE 的
build 菜单中选择 build solution。
功能
启用后,此演示的入口点为 vPKCS11ObjectDemo。目前,演示分为两个较小的演示:
prvObjectImporting 展示了如何将对象导入到 PKCS #11 模块中,而 prvObjectGeneration
展示了如何在 PKCS#11 模块中生成对象。
直接在 IoT 设备上生成凭据更安全,因为如此一来凭据不会暴露于任何外部
系统。如果 IoT 设备具有安全元件,则安全性更高。安全元件是保护
私钥等敏感数据的专用芯片。它们可提供额外的保护,以阻止攻击者试图获得 IoT 设备的私钥
。仅仅将私钥存储在闪存中并不安全。
此演示展示如何将证书导入到 PKCS #11 堆栈中。该操作很有用,因为它允许用户存储应用程序希望信任的任何服务器上的证书
。模板是描述对象的 CK_ATTRIBUTE 数组。
创建 X.509 证书模板:
PKCS11_CertificateTemplate_t xCertificateTemplate;
CK_OBJECT_CLASS xCertificateClass = CKO_CERTIFICATE;
CK_CERTIFICATE_TYPE xCertificateType = CKC_X_509;
CK_BYTE pucLabel[] = pkcs11configLABEL_DEVICE_CERTIFICATE_FOR_TLS;
xCertificateTemplate.xObjectClass.type = CKA_CLASS;
xCertificateTemplate.xObjectClass.pValue = &xCertificateClass;
xCertificateTemplate.xObjectClass.ulValueLen = sizeof( xCertificateClass );
xCertificateTemplate.xSubject.type = CKA_SUBJECT;
xCertificateTemplate.xSubject.pValue = xSubject;
xCertificateTemplate.xSubject.ulValueLen = strlen( ( const char * ) xSubject );
xCertificateTemplate.xValue.type = CKA_VALUE;
xCertificateTemplate.xValue.pValue = ( CK_VOID_PTR ) pkcs11demo_RSA_CERTIFICATE;
xCertificateTemplate.xValue.ulValueLen = ( CK_ULONG ) sizeof( pkcs11demo_RSA_CERTIFICATE );
xCertificateTemplate.xLabel.type = CKA_LABEL;
xCertificateTemplate.xLabel.pValue = ( CK_VOID_PTR ) pucLabel;
xCertificateTemplate.xLabel.ulValueLen = strlen( ( const char * ) pucLabel );
xCertificateTemplate.xCertificateType.type = CKA_CERTIFICATE_TYPE;
xCertificateTemplate.xCertificateType.pValue = &xCertificateType;
xCertificateTemplate.xCertificateType.ulValueLen = sizeof( CK_CERTIFICATE_TYPE );
xCertificateTemplate.xTokenObject.type = CKA_TOKEN;
xCertificateTemplate.xTokenObject.pValue = &xTokenStorage;
xCertificateTemplate.xTokenObject.ulValueLen = sizeof( xTokenStorage );
模板创建后,可以将其与数组中的条目数一起传递给 C_CreateObject
。如果能够创建 x509 证书,则 PKCS#11 模块将解析参数并返回 CKR_OK。
这是将已知证书导入 PKCS #11 模块的好方法。
创建 X.509 证书:
xResult = pxFunctionList->C_CreateObject( hSession,
( CK_ATTRIBUTE_PTR ) &xCertificateTemplate,
sizeof( xCertificateTemplate ) / sizeof( CK_ATTRIBUTE ),
&xCertHandle );
configASSERT( xResult == CKR_OK );
configASSERT( xCertHandle != CK_INVALID_HANDLE );
演示的后半部分介绍如何使用 PKCS #11 生成密钥对。这种方法更可取,因为应用程序永远不会暴露于包含私钥的内存
。私钥实际上从未存储在 PKCS#11 模块之外,
进而降低了攻击者提取私钥的潜在风险。
在以下代码中,同样使用模板来生成密钥。
创建密钥对生成模板:
CK_ATTRIBUTE xPublicKeyTemplate[] =
{
{ CKA_KEY_TYPE, &xKeyType, sizeof( xKeyType ) },
{ CKA_VERIFY, &xTrue, sizeof( xTrue ) },
{ CKA_EC_PARAMS, xEcParams, sizeof( xEcParams ) },
{ CKA_LABEL, pucPublicKeyLabel, sizeof( pucPublicKeyLabel ) - 1 }
};
CK_ATTRIBUTE xPrivateKeyTemplate[] =
{
{ CKA_KEY_TYPE, &xKeyType, sizeof( xKeyType ) },
{ CKA_TOKEN, &xTrue, sizeof( xTrue ) },
{ CKA_PRIVATE, &xTrue, sizeof( xTrue ) },
{ CKA_SIGN, &xTrue, sizeof( xTrue ) },
{ CKA_LABEL, pucPrivateKeyLabel, sizeof( pucPrivateKeyLabel ) - 1 }
};
最后,创建此模板,此模板传递给 C_GenerateKeyPair 时,
PKCS #11 模块会创建一个新的密钥对。
创建密钥对:
xResult = pxFunctionList->C_GenerateKeyPair( hSession,
&xMechanism,
xPublicKeyTemplate,
sizeof( xPublicKeyTemplate ) / sizeof( CK_ATTRIBUTE ),
xPrivateKeyTemplate,
sizeof( xPrivateKeyTemplate ) / sizeof( CK_ATTRIBUTE ),
&xPublicKeyHandle,
&xPrivateKeyHandle );
configASSERT( xResult == CKR_OK );
Copyright (C) Amazon Web Services, Inc. or its affiliates. All rights reserved.