corePKCS11 签名与验证演示
简介
本演示为 corePKCS11 演示系列中的第四个。该演示介绍了用于签署消息及验证消息签名
的 PKCS # 11 API。若需查看 PKCS # 11 标准,请
点击此处。
corePKCS11 演示项目使用
FreeRTOSWindows 移植,因此可以使用 Windows 上的
Visual Studio 免费社区版
构建和评估,无需任何特定的殊 MCU 硬件。
此演示中展示的函数集可分为:
源代码组织
基于 PKCS #11 的双向验证演示的 Visual Studio 解决方案文件名为
pkcs11_demos.sln,位于
FreeRTOS 主下载文件的 FreeRTOS\FreeRTOS-Plus\Demo\corePKCS11_Windows_Simulator\ 目录。
点击放大
配置演示项目
要配置演示项目,请将 configPKCS11_SIGN_AND_VERIFY_DEMO 设置为 1,
其位于 pkcs11_demo_config.h。此为默认启用项。完成上述操作后,即可运行演示,
无需其他配置。
构建演示项目
此演示项目使用的是
免费社区版 Visual Studio。
- 在 Visual Studio IDE 内打开
FreeRTOS\FreeRTOS-Plus\Demo\corePKCS11_Windows_Simulator\pkcs11_demos.sln
Visual Studio 解决方案文件。
- 在 IDE 的 build 菜单中选择 build solution。
功能
此演示的入口点为 vPKCS11SignVerifyDemo。
请注意,此演示需要由 prvObjectGeneration 函数在 Objects 演示中创建的
公钥和私钥对。
此演示将使用此密钥对签署消息摘要。(关于如何创建摘要,请参阅 "Mechanisms and Digests" 演示。)
另外,此演示还介绍了一些有用的函数,可以在“core_pkcs11.h”头文件中找到,用于简化
之前的演示所呈现的一些功能。
第一步是查找 Objects 演示中生成的私钥和公钥的对象句柄。
找到合适的对象句柄
xResult = xFindObjectWithLabelAndClass( hSession,
pkcs11configLABEL_DEVICE_PRIVATE_KEY_FOR_TLS,
CKO_PRIVATE_KEY,
&xPrivateKeyHandle );
configASSERT( xResult == CKR_OK );
configASSERT( xPrivateKeyHandle != CK_INVALID_HANDLE );
xResult = xFindObjectWithLabelAndClass( hSession,
pkcs11configLABEL_DEVICE_PUBLIC_KEY_FOR_TLS,
CKO_PRIVATE_KEY,
&xPublicKeyHandle );
configASSERT( xResult == CKR_OK );
configASSERT( xPublicKeyHandle != CK_INVALID_HANDLE );
找到对象句柄后,可以用其签署消息摘要,并验证签名。私钥
应始终受到保护,因为它可以用于签署消息,使收件人能够验证
私钥确实来自消息书写者。任何拥有由私钥生成的公钥并用其
验证消息的人,必须能够假定其实际上属于来自已知发件人的有效消息。
创建一个签名
xResult = pxFunctionList->C_SignInit( hSession,
&xMechanism,
xPrivateKeyHandle );
configASSERT( xResult == CKR_OK );
xResult = pxFunctionList->C_Sign( hSession,
xDigestResult,
pkcs11SHA256_DIGEST_LENGTH,
xSignature,
&xSignatureLength );
configASSERT( xResult == CKR_OK );
configASSERT( xSignatureLength == pkcs11ECDSA_P256_SIGNATURE_LENGTH );
下一步是使用公钥来确保 PKCS # 11 堆栈可以确认我们收到的消息来自发件人。(公钥来自于用于创建消息签名的私钥)这一步将通过利用 PKCS # 11 堆栈来验证包含签名的缓冲区来完成。
验证一个签名
xResult = pxFunctionList->C_VerifyInit( hSession,
&xMechanism,
xPublicKeyHandle );
configASSERT( xResult == CKR_OK );
xResult = pxFunctionList->C_Verify( hSession,
xDigestResult,
pkcs11SHA256_DIGEST_LENGTH,
xSignature,
xSignatureLength );
if( xResult == CKR_OK )
{
configPRINTF( ( "The signature of the digest was verified with the" \
" public key and can be trusted.\r\n" ) );
} else
{
configPRINTF( ( "Unable to verify the signature with the given public" \
" key, the message cannot be trusted.\r\n" ) );
}
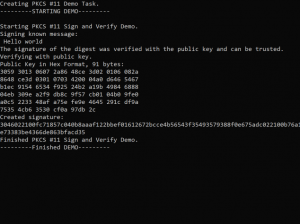
如何验证终端中的签名
演示将输出签名缓冲区的内容以及十六进制格式的公钥,可用其
验证签名。
提取公钥
可按照以下步骤,从含有公钥的二进制文件中导出公钥。
- 将公钥以十六进制字节形式导出并打印。此演示会将十六进制字节
打印至控制台。
- 创建名为 "
DevicePublicKeyAsciiHex.txt" 的空白文本文件。
- 将公钥的十六进制值复制并粘贴到此文本文件中。
- 使用 xxd 工具将十六进制文件转换为二进制文件:
$ xxd -r -ps DevicePublicKeyAsciiHex.txt DevicePublicKeyDer.bin
xxd 将抓取一个包含十六进制数据的文本文件,并在其中输出其对应的二进制文件。有关 xxd 的更多信息,
请参阅 "$ man xxd"。
- 将公钥的二进制编码转换为 PEM 格式:
$ openssl ec -inform der -in DevicePublicKeyDer.bin -pubin -pubout -outform pem -out public_key.pem
我们现在已经提取了公钥,可以使用它来验证由 PKCS # 11 堆栈生成的签名。
提取签名
- 创建一个名为 "
signature.txt" 的空白文本文件。
- 复制粘贴由演示写入控制台的签名缓冲区。
- 将签名转换为二进制格式。
$ xxd -r -ps signature.txt signature.bin
警告:运行对象生成演示将创建一个新的密钥对,导致
必须重新执行上述步骤!
使用 OpenSSL 验证签名
OpenSSL 可用于验证签名是否可信,以及 PKCS # 11 堆栈的工作行为是否符合预期。OpenSSL 是
一套广泛使用的加密组件,可提供许多实用功能。下列命令即可使用提取的公钥来验证
由 PKCS #11 堆栈创建的二进制签名。
$ openssl dgst -sha256 -verify public_key.pem -signature signature.bin msg.txt
Copyright (C) Amazon Web Services, Inc. or its affiliates. All rights reserved.